Overview
The goal of this tutorial is to explain how to use Zero Touch Provisioning (ZTP) for deployment on Arista switches running vEOS operating system on VMware ESXi 6.7.
Lab setup
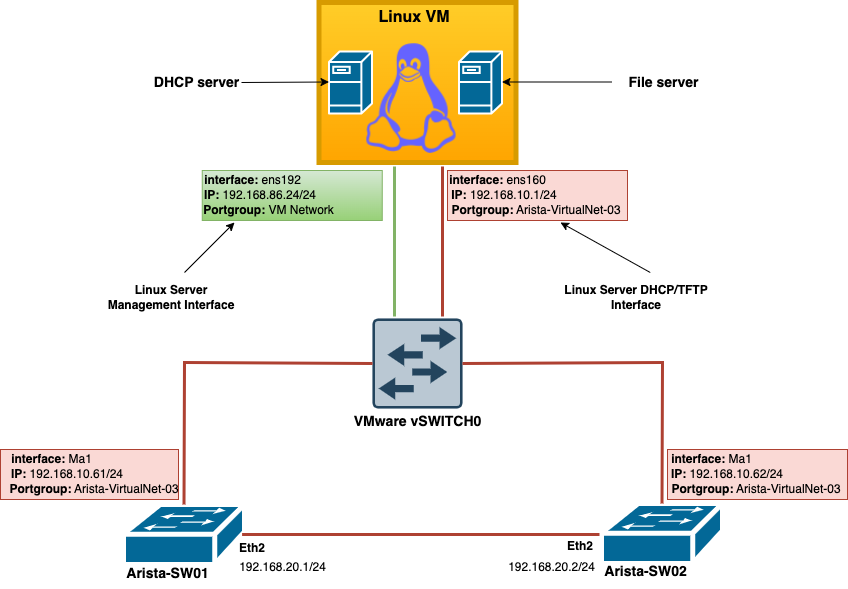
Arista Virtual Switch
-
-
- OS = vEOS-lab-4.31.0F
- CPUs = 1
- Memory = 2GB
-
Linux virtual server
-
-
- Distro = Ubuntu 22.04.3 LTS
- CPUs = 1
- Memory = 2GB
- HD = 10 GB
-
Hardware
-
-
- Host = ThinkServer TS440
- Hypervisor = ESXi 6.7
-
What is ZTP?
ZTP (Zero Touch Provisioning) is a deployment and configuration strategy where the primary goal is to automate the provisioning and configuration of devices, such as network equipment or computing devices, with minimal manual intervention. ZTP presents many benefits, including:
- Time and Cost Savings: ZTP significantly reduces the time and effort required to deploy and configure devices, leading to cost savings, especially in large-scale deployments.
- Consistency: Automated provisioning ensures a consistent configuration across all devices, reducing the risk of configuration errors that can arise from manual processes.
- Scalability: ZTP is highly scalable, making it well-suited for environments with a large number of devices.
- Reduced Human Error: Automation reduces the chances of human error during the provisioning process, improving overall system reliability.
Arista ZTP Requirement
TO deploy ZTP, we need:
-
- A working DHCP Server with option 67 (boot file name) for Arista switches
- a working File Server to Download script file.
- a valid script file.
How does ZTP work?
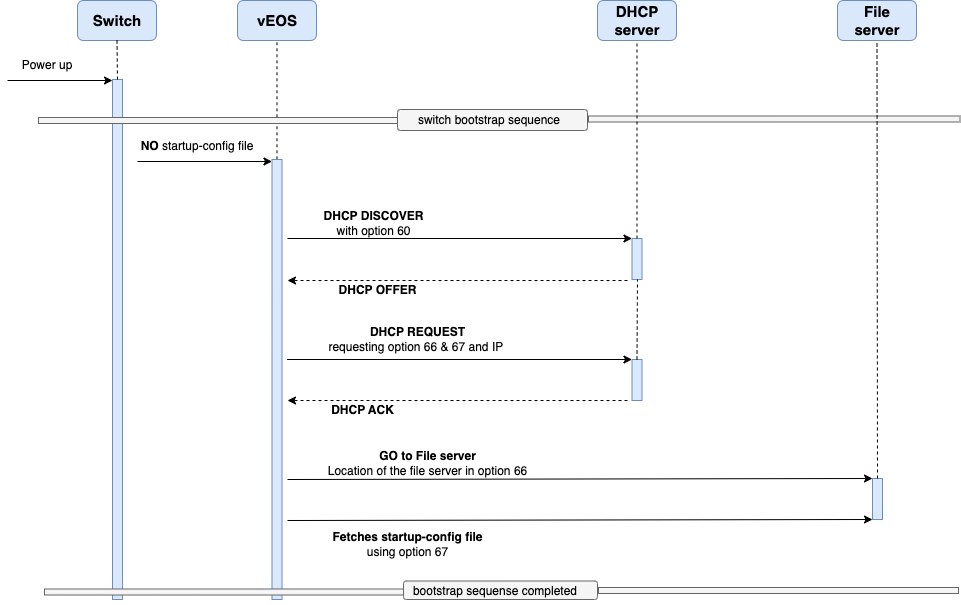
Once powered up or after a reboot, Arista switch initiates the bootstrap sequence which involves at one point looking for its startup-config file. If the file is missing, ZTP process is automatically started (except in the case ZTP is cancelled or disabled in the boot). In ZTP mode, the Arista switch:
- ZTP first broadcast DHCP DISCOVER message containing DHCP option 60 (DHCP client unique identifier which in the case of Arista will be the switch system Mac address )on all connected interfaces
- The DHCP server replies by sending unicast DHCP OFFER .
- After the switch receives a DHCP OFFER, it responds with a DHCP REQUEST for Option 66 (File server name), Option 67 (boot file name), and dynamic network configuration settings.
- When the switch receives a DHCP ACK, it configures the network settings, then fetches the file from the location listed in Option 67. The values returned in Option 67 can be of the following two types:
- Option 67 returns a network URL (http:// or ftp://), the switch obtains the file from the location specified in the URL.
- Option 67 returns a file name, the switch retrieves the file from the TFTP server listed in Option 66.
- The file specified in Option 67 can be a startup-config file or a boot script. The switch distinguishes between a startup-config file and a boot script by examining the first line in the file:
- The first line of a boot file must consist of the #! characters followed by the interpreter path. The switch sees this sequence, executes the code in the script and then reboots the device. The boot script may fetch an EOS software image or perform required customization tasks. The following sample boot file fetches an EOS software image and stores a startup configuration file to flash
- #!/usr/bin/Cli -p2
copy tftp://192.168.10.1/Arista-SW01-ztp-switch-startup-config flash:startup-config
copy tftp://192.168.10.1/EOS-2.swi flash:EOS-2.swi
configboot system flash:EOS-2.swi - The switch identifies any other file as a startup-config file. The switch copies the startup-config file into flash as /mnt/flash/startup-config, then reboots.
DHCP Server Configuration
For the sake of this Lab, I decided to run the DHCP server on a Ubuntu Linux virtual machine with the characteristics defined in the lab setup above (Of course, feel free to use any other Linux distributions or OSs your are more confortable with).During the installation of my Ubuntu VM, I set it up to get an IP from the DHCP on my local network so that I could the VM simultaneously during installation.
verification of the Linux VM distro
user1@ubuntu:~$ lsb_release -a
No LSB modules are available.
Distributor ID: Ubuntu
Description: Ubuntu 22.04.3 LTS
Release: 22.04
Codename: jammy
update Ubuntu package index
user1@ubuntu:~$ sudo apt update
[sudo] password for user1:
Static IP And DHCP Interface Configuration
“/etc/netplan/00-installer-config.yaml” is the file we should update for any permanent change we want to bring to the interface in Ubuntu 22.04.3.
At the moment, both interfaces are configured to get their IP from DHCP as you can see below:vi /etc/netplan/00-installer-config.yaml
# This is the network config written by 'subiquity'
network:
  ethernets:
    ens160:
      dhcp4: true
    ens192:
      dhcp4: true
  version: 2
It is good practice to have servers on the network configured with a static IP address. Moreover, without a static IP address being assigned to the interface that we will be using for DHCP, we would get an error from dhcpd when starting the service. We will now configure both interfaces with a static IP address and we will select one for the DHCP communication.
-
-
- ens160 – The interface allocated for DHCP
- ens192 – The management Interface of the Linux server
-
sudo vi /etc/netplan/00-installer-config.yaml
# This is the network config written by 'subiquity'
network:
  ethernets:
# DHCP interface
    ens160:
      dhcp4: no
      addresses:
        - 192.168.10.1/24

# Managment Interface
    ens192:
      dhcp4: no
      addresses:
        - 192.168.86.24/24
      nameservers:
        addresses: [8.8.8.8,8.8.4.4]
      routes:
        - to: default
          via: 192.168.86.1
  version: 2
Once completed, save the file and apply the changes by running the following command:
user1@ubuntu:~$ sudo netplan apply
user1@ubuntu:~$
verification
user1@ubuntu:~$ ip a show
1: lo: <LOOPBACK,UP,LOWER_UP> mtu 65536 qdisc noqueue state UNKNOWN group default qlen 1000
    link/loopback 00:00:00:00:00:00 brd 00:00:00:00:00:00
    inet 127.0.0.1/8 scope host lo
       valid_lft forever preferred_lft forever
    inet6 ::1/128 scope host
       valid_lft forever preferred_lft forever
2: ens160: <BROADCAST,MULTICAST,UP,LOWER_UP> mtu 1500 qdisc fq_codel state UP group default qlen 1000
    link/ether 00:0c:29:eb:c0:4a brd ff:ff:ff:ff:ff:ff
    altname enp3s0
    inet 192.168.10.1/24 brd 192.168.10.255 scope global ens160
       valid_lft forever preferred_lft forever
    inet6 fe80::20c:29ff:feeb:c04a/64 scope link
       valid_lft forever preferred_lft forever
3: ens192: <BROADCAST,MULTICAST,UP,LOWER_UP> mtu 1500 qdisc fq_codel state UP group default qlen 1000
    link/ether 00:0c:29:eb:c0:54 brd ff:ff:ff:ff:ff:ff
    altname enp11s0
    inet 192.168.86.24/24 brd 192.168.86.255 scope global ens192
       valid_lft forever preferred_lft forever
    inet6 fe80::20c:29ff:feeb:c054/64 scope link
       valid_lft forever preferred_lft forever
user1@ubuntu:~$ ip route show
default via 192.168.86.1 dev ens192 proto static
192.168.10.0/24 dev ens160 proto kernel scope link src 192.168.10.1
192.168.86.0/24 dev ens192 proto kernel scope link src 192.168.86.24DHCP server configuration
First, we need to Install DHCP package and its dependencies. We can accomplish it using the command below:
sudo apt install isc-dhcp-server -y“/etc/default/isc-dhcp-server” is the file we need to update in order to select the interface that will be participating in the DHCP process, and this file was created after the corresponding package was installed above. In the case of this lab, that interface will be ens160.sudo vi /etc/default/isc-dhcp-server
# Defaults for isc-dhcp-server (sourced by /etc/init.d/isc-dhcp-server)

# Path to dhcpd's config file (default: /etc/dhcp/dhcpd.conf).
#DHCPDv4_CONF=/etc/dhcp/dhcpd.conf
#DHCPDv6_CONF=/etc/dhcp/dhcpd6.conf

# Path to dhcpd's PID file (default: /var/run/dhcpd.pid).
#DHCPDv4_PID=/var/run/dhcpd.pid
#DHCPDv6_PID=/var/run/dhcpd6.pid

# Additional options to start dhcpd with.
#       Don't use options -cf or -pf here; use DHCPD_CONF/ DHCPD_PID instead
#OPTIONS=""

# On what interfaces should the DHCP server (dhcpd) serve DHCP requests?
#       Separate multiple interfaces with spaces, e.g. "eth0 eth1".
INTERFACESv4="ens160"
### INTERFACESv6=""
Next, “/etc/dhcp/dhcpd.conf” is the file we need to update if we want to bring any permanent (any change that will persist after a reboot) to the DHCP server on an Ubuntu 22.04.3).
It is always good practice to backup the current configuration file just in case we need to do a rollback. We can do so by running the command below:
user1@ubuntu:~$ sudo cp /etc/dhcp/dhcpd.conf /etc/dhcp/dhcpd_BACKUP_2024_01_01.confHere is a sample configuration of /etc/dhcp/dhcpd.conf file for the purpose of this lab.sudo vi /etc/dhcp/dhcpd.conf
#-- Lease time-out
default-lease-time 600;
max-lease-time 7200;

#-- Make this DHCP server authoritative for this network.
authoritative;

#-- Configuring the DHCP pool
subnet 192.168.10.0 netmask 255.255.255.0 {
range 192.168.10.10 192.168.10.20;
option domain-name "openteky.com";
}

host Arista-SW01 {
# DHCP option 60
# "00:0c:29:06:ac:90" is the System MAC address of Arista-SW01
# it can be obtained by running the command "show version" on Arista-SW01 console.
option dhcp-client-identifier 00:0c:29:e6:ac:90;
# This IP address will be assigned to the Mgmt Interface of the switch
fixed-address 192.168.10.10;
# DHCP option 66 & option 67
# "Arista-sw01-ztp-switch-startup-config" is the startup-config file that will be uploaded on Arista-SW01
option bootfile-name "tftp://192.168.10.1/Arista-sw01-ztp-switch-startup-config";
}

host Arista-SW02 {
# DHCP option 60
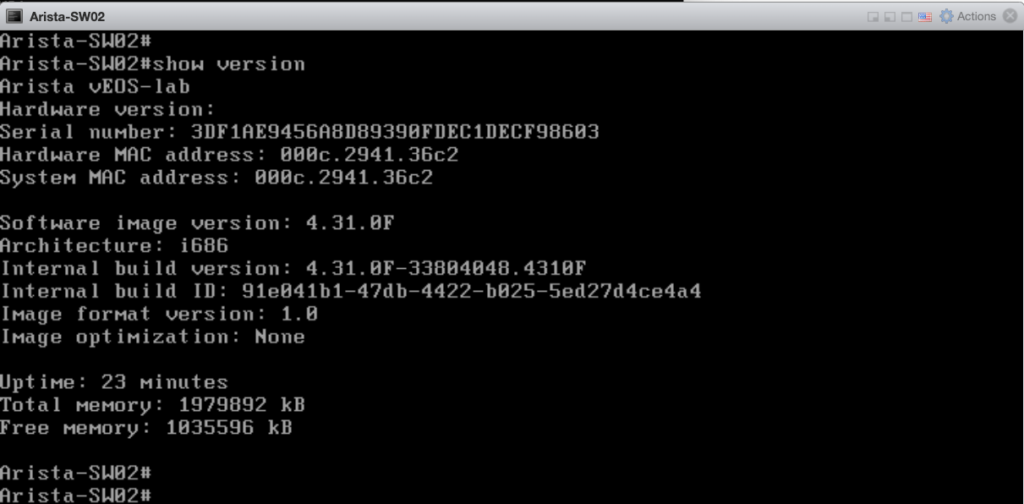
# "00:0c:29:41:36:c2" is the System MAC address of Arista-SW02
# it can be obtained by running the command "show version" on Arista-SW02 console.
option dhcp-client-identifier 00:0c:29:41:36:c2;
# This IP address will be assigned to the Mgmt Interface of the switch
fixed-address 192.168.10.11;
# DHCP option 66 & option 67
# "Arista-sw02-ztp-switch-startup-config" is the startup-config file that will be uploaded on Arista-SW02
option bootfile-name "tftp://192.168.10.1/Arista-sw02-ztp-switch-startup-config";
}
For every change you make on a DHCP server config file, you have to restart the corresponding service using the command below:
user1@ubuntu:~$ sudo service isc-dhcp-server restart
user1@ubuntu:~$
Verify DHCP server service status
user1@ubuntu:~$ sudo systemctl status isc-dhcp-server
● isc-dhcp-server.service - ISC DHCP IPv4 server
     Loaded: loaded (/lib/systemd/system/isc-dhcp-server.service; enabled; vendor preset: enabled)
     Active: active (running) since Sun 2023-12-31 05:21:55 UTC; 3min 35s ago
       Docs: man:dhcpd(8)
   Main PID: 2889 (dhcpd)
      Tasks: 4 (limit: 2221)
     Memory: 4.8M
        CPU: 14ms
     CGroup: /system.slice/isc-dhcp-server.service
             └─2889 dhcpd -user dhcpd -group dhcpd -f -4 -pf /run/dhcp-server/dhcpd.pid -cf /etc/dhcp/dhcpd.conf ens160

Dec 31 05:21:55 ubuntu sh[2889]: Wrote 0 new dynamic host decls to leases file.
Dec 31 05:21:55 ubuntu dhcpd[2889]: Wrote 0 leases to leases file.
Dec 31 05:21:55 ubuntu sh[2889]: Wrote 0 leases to leases file.
Dec 31 05:21:55 ubuntu dhcpd[2889]: Listening on LPF/ens160/00:0c:29:eb:c0:4a/192.168.10.0/24
Dec 31 05:21:55 ubuntu sh[2889]: Listening on LPF/ens160/00:0c:29:eb:c0:4a/192.168.10.0/24
Dec 31 05:21:55 ubuntu dhcpd[2889]: Sending on   LPF/ens160/00:0c:29:eb:c0:4a/192.168.10.0/24
Dec 31 05:21:55 ubuntu sh[2889]: Sending on   LPF/ens160/00:0c:29:eb:c0:4a/192.168.10.0/24
Dec 31 05:21:55 ubuntu dhcpd[2889]: Sending on   Socket/fallback/fallback-net
Dec 31 05:21:55 ubuntu sh[2889]: Sending on   Socket/fallback/fallback-net
Dec 31 05:21:55 ubuntu dhcpd[2889]: Server starting service.
user1@ubuntu:~$
TFTP server Configuring
The file server we will be using in this case study is a TFTP server (Remember that you can as well use a FTP or a HTTP file service). This is where we will be hosting the startup-config files for both Arista-SW01 and Arista-SW02, that is:
-
-
- Arista-sw01-ztp-switch-startup-config for Arista-SW01
- Arista-sw02-ztp-switch-startup-config for Arista-SW02
-
To have a TFTP server running on an Ubuntu 22.04, we first need to install the corresponding package, that is tftpd-hpa:
sudo apt install tftpd-hpaIt is always recommended to have a backup of the configuration file before making any change to it.
user1@ubuntu:~$ sudo vi /etc/default/tftpd-hpa
user1@ubuntu:~$
Next, we need to determine the port (69),the interface (192.168.10.1) as well as the directory that will be used to stored the startup-config and this configuration takes place in “/etc/default/tftpd-hpa” file. Below is a sample configuration for the purpose of this lab.sudo vi /etc/default/tftpd-hpa
# /etc/default/tftpd-hpa

#-- sets the user that the TFTP server will run as.
TFTP_USERNAME="tftp"

#-- sets the directory where the TFTP server will look for files to serve.
TFTP_DIRECTORY="/srv/tftp"

#-- sets the IP address and port that the TFTP server will listen on.
TFTP_ADDRESS="192.168.10.1:69"

#-- Preventing files from being deleted or overwritten.
TFTP_OPTIONS="--secure"
Verifying file permission on TFTP directory (/svr/ftfp)
user1@ubuntu:~$ ls -l /srv/ | grep tftp
drwxr-xr-x 2 root nogroup 4096 Dec 31 05:32 tftp
user1@ubuntu:~$
Everytime you make a change to the TFTP server, you have to restart the corresponding service with the below command:
sudo systemctl restart tftpd-hpayou can also use the following command to restart the service
sudo service tftpd-hpa restartchecking the status of the TFTP server.
user1@ubuntu:~$ sudo systemctl status tftpd-hpa
● tftpd-hpa.service - LSB: HPA's tftp server
     Loaded: loaded (/etc/init.d/tftpd-hpa; generated)
     Active: active (running) since Sun 2023-12-31 19:53:37 UTC; 35s ago
       Docs: man:systemd-sysv-generator(8)
    Process: 4063 ExecStart=/etc/init.d/tftpd-hpa start (code=exited, status=0/SUCCESS)
      Tasks: 1 (limit: 2221)
     Memory: 408.0K
        CPU: 12ms
     CGroup: /system.slice/tftpd-hpa.service
             └─4072 /usr/sbin/in.tftpd --listen --user tftp --address 192.168.10.1:69 --secure /srv/tftp

Dec 31 19:53:37 ubuntu systemd[1]: tftpd-hpa.service: Deactivated successfully.
Dec 31 19:53:37 ubuntu systemd[1]: Stopped LSB: HPA's tftp server.
Dec 31 19:53:37 ubuntu systemd[1]: Starting LSB: HPA's tftp server...
Dec 31 19:53:37 ubuntu tftpd-hpa[4063]:  * Starting HPA's tftpd in.tftpd
Dec 31 19:53:37 ubuntu tftpd-hpa[4063]:    ...done.
Dec 31 19:53:37 ubuntu systemd[1]: Started LSB: HPA's tftp server.
Startup files Configuration
In the TFTP directory (/srv/tftp) defined above, let’s create the startup configuration files for both Arista-SW01 and Arista-SW02, that is:
Arista-SW01-ztp-switch-startup-configArista-SW02-ztp-switch-startup-config)
user1@ubuntu:~$ cd /srv/tftp
user1@ubuntu:/srv/tftp$
user1@ubuntu:/srv/tftp$ sudo touch Arista-SW01-ztp-switch-startup-config
user1@ubuntu:/srv/tftp$ sudo touch Arista-SW02-ztp-switch-startup-config
Below is a sample configuration of Arista-SW01-ztp-switch-startup-config which will be uploaded on Arista-SW01
!!! Sample Arista-SW01 Switch Configuration

hostname Arista-SW01
!
interface Ethernet1
   description Connected to ZTP Management Network
   switchport access vlan 10
   speed 100full
   no shutdown
!
interface Ethernet2
   description Connected to Arista-SW02
   ip address 192.168.20.1/24
   no switchport
   speed 100full
   no shutdown
!
vlan 10
  name ZTP_Mgmt_VLAN
!
interface Vlan10
   description ZTP Management VLAN
   ip address 192.168.86.60/24
!
ip routing
!
line console
   exec-timeout 0 0
!
management api http-commands
   no shutdown
!
management ssh
  enable
  timeout 120
  server disable
!
username admin privilege 15 secret arista
!
ip ssh server
!
Below is a sample configuration of Arista-SW02-ztp-switch-startup-config which will be uploaded on Arista-SW02
!!! Sample Arista-SW02 Switch Configuration

hostname Arista-SW02
!
interface Ethernet1
   description Connected to ZTP Management Network
   switchport access vlan 10
   speed 100full
   no shutdown
!
interface Ethernet2
   description Connected to Arista-SW01
   ip address 192.168.20.2/24
   no switchport
   speed 100full
   no shutdown
!
vlan 10
  name ZTP_Mgmt_VLAN
!
interface Vlan10
   description ZTP Management VLAN
   ip address 192.168.86.61/24
!
ip routing
!
line console
   exec-timeout 0 0
!
management api http-commands
   no shutdown
!
management ssh
  enable
  timeout 120
  server disable
!
username admin privilege 15 secret arista
!
ip ssh server
!
Booting up Arista virtual switches
Arista-SW01
When we start Arista-SW01, it goes through the bootstrap sequence as you will see in the captures below until it fetches the startup-config file
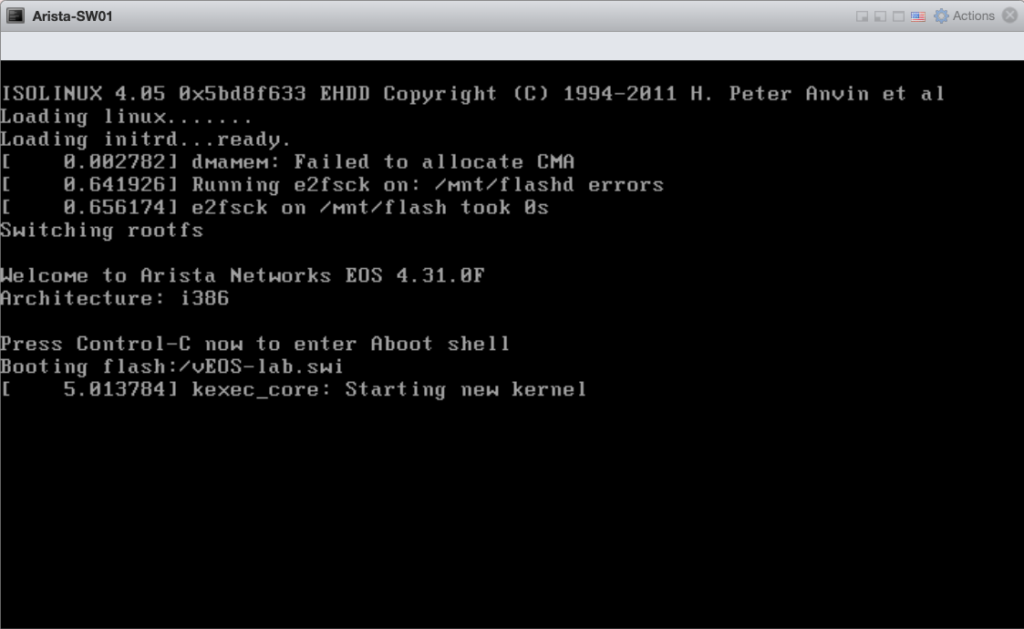
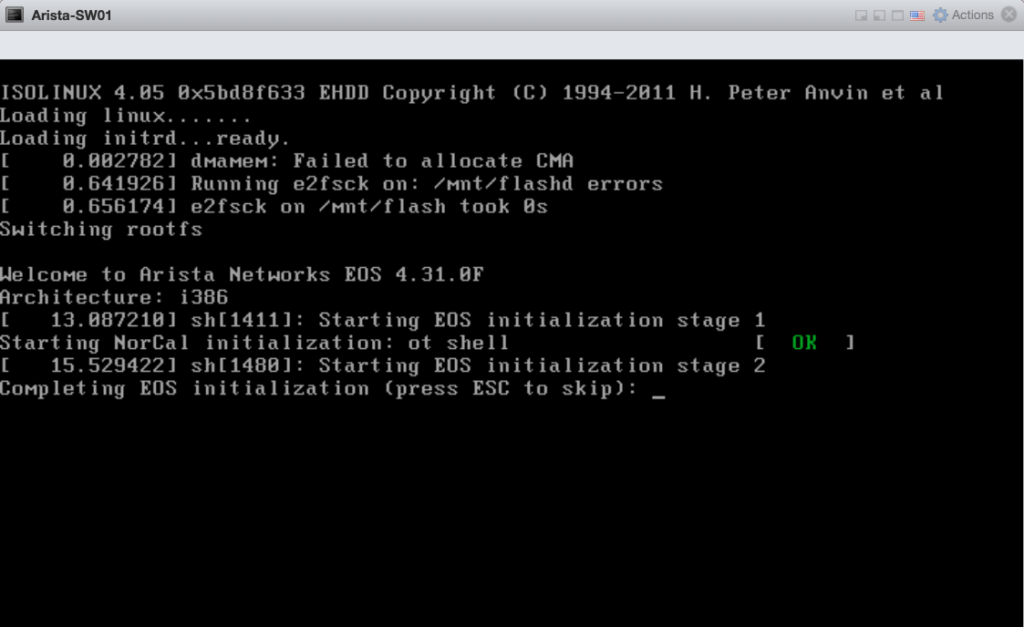
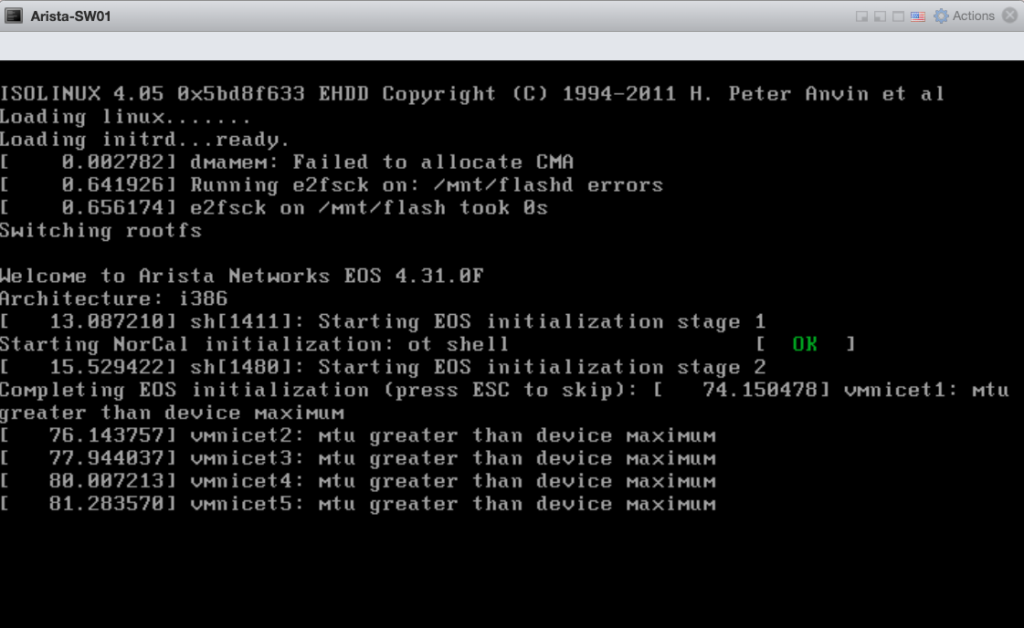
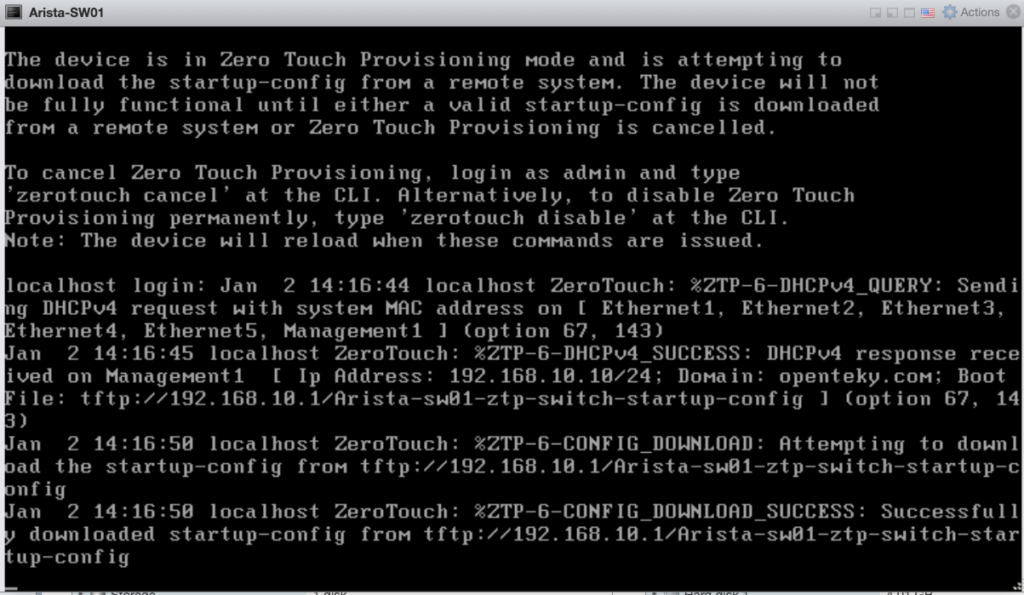
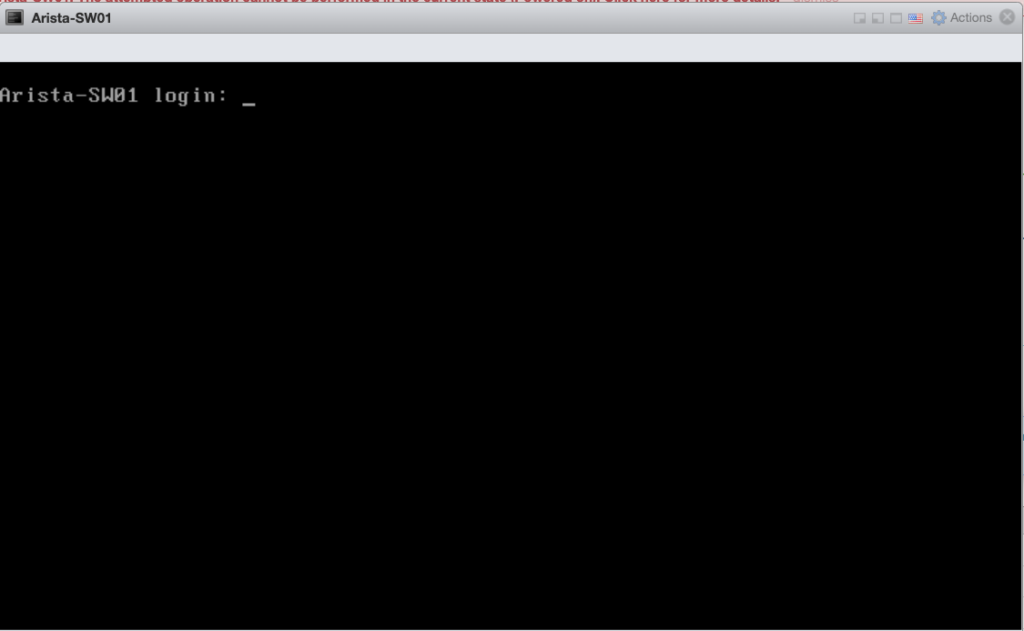


Arista-SW02
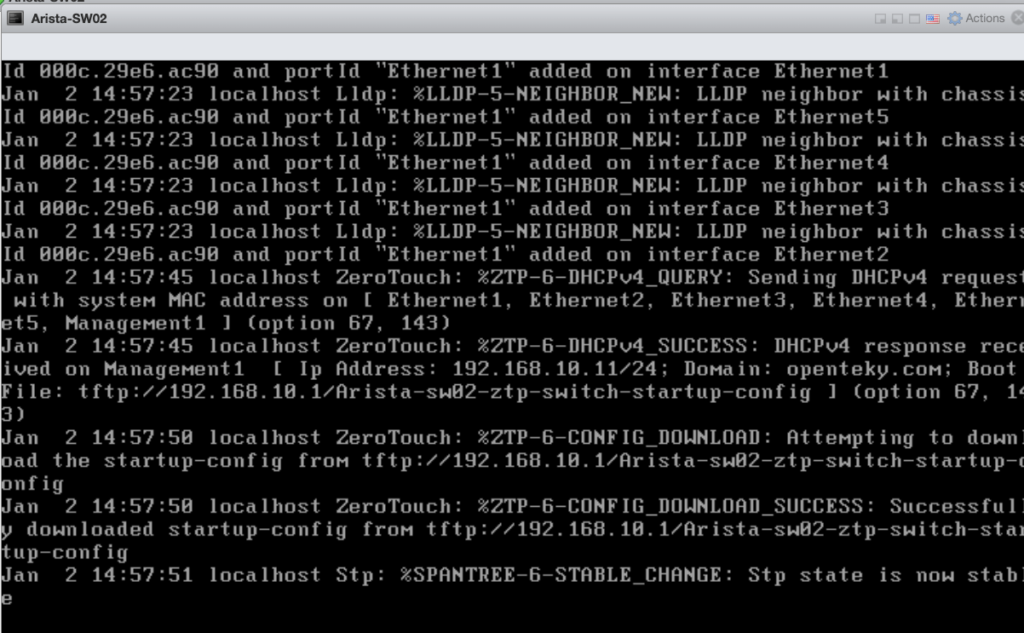
When we start Arista-SW02, it goes through the bootstrap sequence similar to Arista-SW01 as you will see in the captures below until it fetches the startup-config file (I just put the most important capture here giving that everything else is similar to the captures for Arista-SW01).

Connectivity test
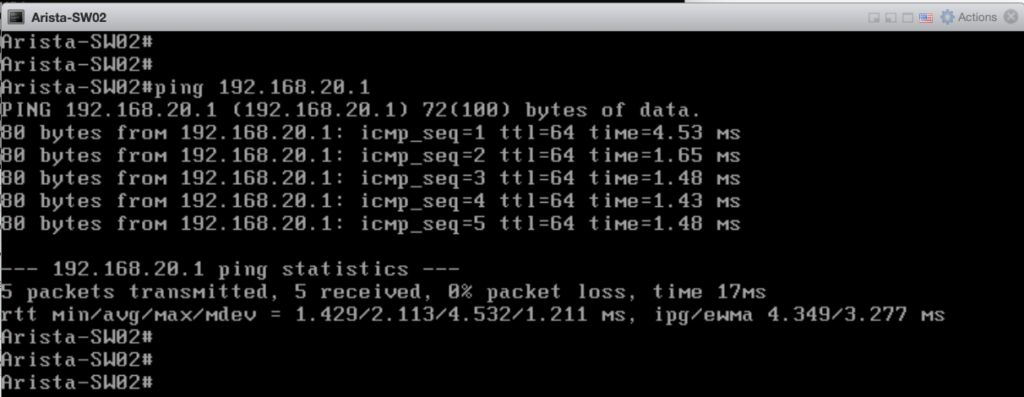
As you can see in the test results, the ping between Arista-SW01 and Arista-SW02 is successful.
Summary
ZTP is a key part of network deployment at large scale and is suited to a wide array of network topologies. It can be extended to support the use of serial number, LLDP neighbors or other unique identifiers. With the use of scripting tools, the configuration file creation can be fully automated, leading to the elimination of repetitive tasks in network switch deployment and upgrading. ZTP is a powerful new feature for the modern data center.
